How to do Forward Synchronization between Python and Pure Data using OSC Timestamps
14 May 2025
•
network
•
audio
•
osc
•
synchronization
...
Open Sound Control (OSC) is a flexible and high-resolution media encoding designed for sending audio control messages between musical devices in real time, similar to MIDI, originally developed by researchers Matt Wright and Adrian Freed at CNMAT, UC Berkeley, in 1997 (Schmeder, Freed, 2008). Because of its high-resolution data transfer (64-bit compared to 8-bit MIDI) and built-in Timestamp support, OSC provides an ideal framework for exploring creative and new approaches to synchronization and latency management over networks.
Last year, I led a few workshops on the unique synchronization capabilities of OSC as part of my networked music course at the University of Oslo. In this post, I distill my workshops into a written step-by-step guide, showing how to use OSC Timestamps and a technique called Forward Synchronization to effectively synchronize musical devices between Python and Pure Data. Full code examples and source code included below.
NB: Following the contents of this workship requires an intermediate familiarity with OSC for Python and Pure Data.
What are OSC Timestamps and Forward Synchronization?
OSC streams consist of sequences of OSC bundles. Each bundle includes a unique identifier, encapsulated message, and timestamp.
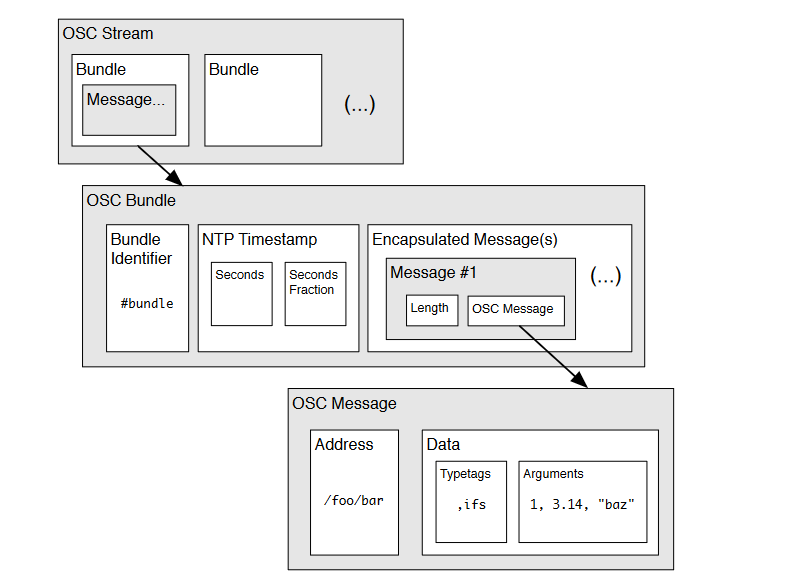
OSC timestamps are essentially NTP timestamps; a 64-bit fixed floating point number that tells the time since midnight on January 1st, 1900, down to a fractional part of a second. The first 32 bits specify the number of seconds since midnight on January 1, 1900, and the last 32 bits specify fractional parts of a second to a precision of about 200 picoseconds. For example, the OSC timestamp 1746381622 corresponds to May 5th, 2025, at 20:00:48 PM.
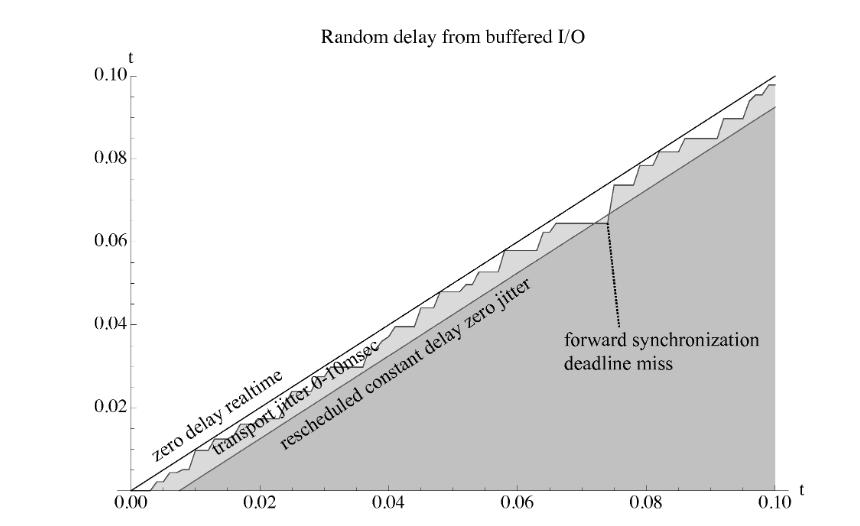
The Timestamp integration makes OSC a perfect candidate for creating custom schemes for synchronizing musical devices across remote distances. One exciting synchronization strategy is called Forward Synchronization, a method described by Schmeder, Freed & Wessel in their 2010 paper Best Practices for Open Sound Control.
Forward synchronization is a technique where a fixed delay is added to timestamps that sync two or more musical devices, scheduling all musical events a short time into the future to mitigate two key problems: transport latency between machines and the jitter that destabilizes network communication. However, it's not as simple as choosing an arbitrary delay. To counteract jitter effectively, the clock‐synchronization error must remain smaller than the average transport jitter, and the forward offset itself must be carefully tuned to current network conditions. In any case, Forward synchronization offers us a dynamic framework for building custom synchronization schemes with OSC.
Code setup and dependencies
This guide below details OSC communication specifically between Python and Pure Data (PD). You can choose to follow in both environemnts, as demonstrated, or simply use the one you are most familiar with. For the Python development, download and install Python version 3. Then, install the libraries playsound, for audio playcback, and python-osc, for OSC commnication, through pip or via download.
I've tested the code on playsound v.1.2.2 and python-osc v.1.9.3. Playsound is trickier with the latest versions, but python-osc still seems to work fine (as of January 2026).
For PD part, install Pure Data Vanilla, v0.54. Then, download the mrpeach library. We will use mrpeach for OSC communication. I recommend installing the 32-bit version of PD vanilla for mrpeach to work as intended. Find the full code repository at my GitHub, complete with full PD patches and both jupyter notebooks and pyscript versions of the Python parts. I've also not tested on newer version of PD.
Step 1 - Simple P2P messaging
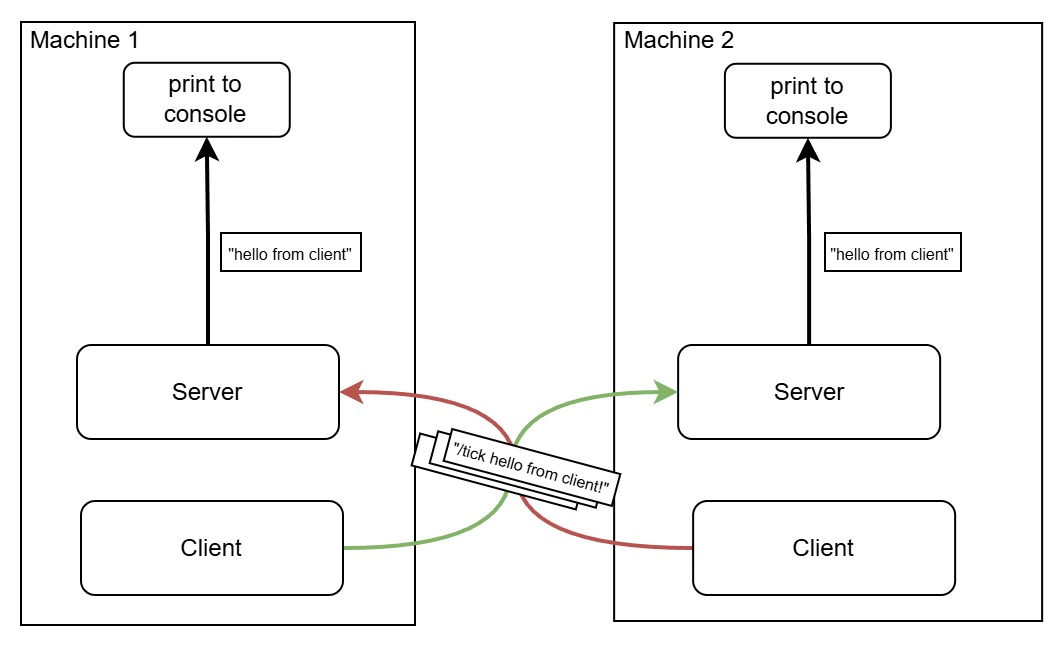
To be able to communicate OSC bidirectionally over a local network, or between two machines, we must first define some clients and servers. These will be the basis for the entire tutorial.
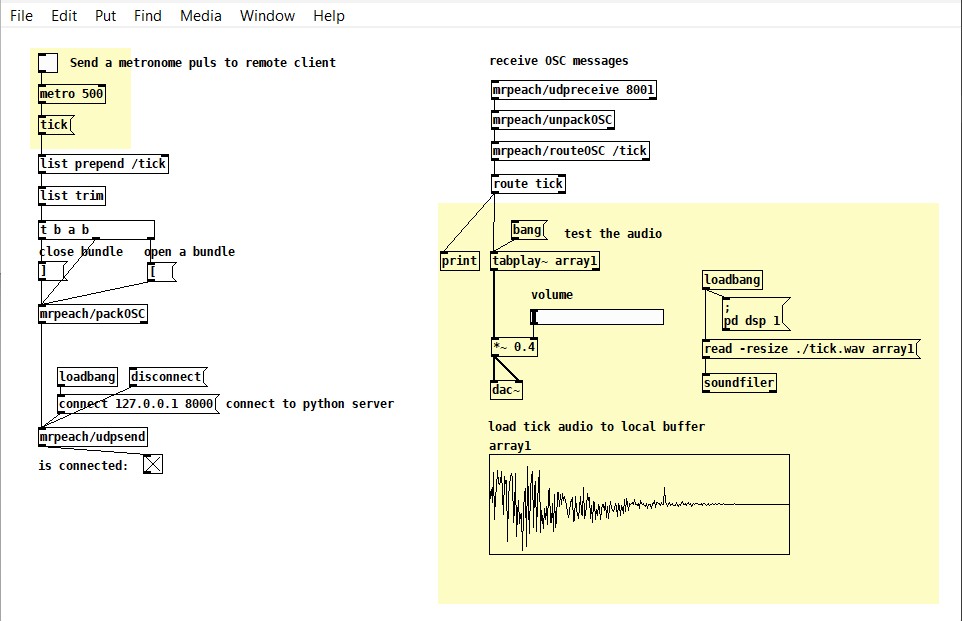
Creating an OSC server in PD is simple using the mrpeach objects. We use [udpreceive] to receive OSC messages from the network, [unpackOSC] to unpack the OSC bundles and finally [routeOSC] to filter based on unique OSC addresses. It's also possible to use the native PD [netsend] and [netreceive] objects to handle the networking. However, note that these objects might require additional config to be compatible with OSC streams.
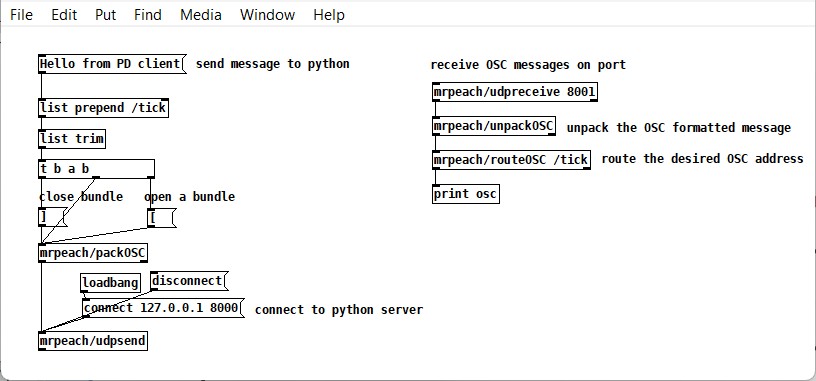
Similarly, on the client side, we can use mrpeach's [packOSC] to gather OSC bundles before sending with [udpsend]. In the example image above, notice that the OSC bundles are manually opened and closed using square brackets before entering [packOSC].
Last, specify the network port numbers to use. In my examples, I use port 8001 for sending from PD and receiving in Python, and port 8000 for sending from Python and receiving in PD.
In Python, we start by separating the server and client logic. In "./server.py", create a simple OSC server with the python_osc and dispatcher methods. Dispatchers are individual functions passed to server_osc where we can specify precise logic for particular OSC addresses. This is handy if we want to increase the complexity of our code in the future and listen to more addresses at once. In our simple case, we will only create one dispatcher that listens for "/tick" messages.
Finally, since our Python server will run concurrently with one or more clients, I recommend starting the server in a unique thread. Threading gives us an elegant and dynamic way to start and stop the continuous OSC network transmission processes. We can implement threading using the Threading library.
We can build a simple OSC Python client in the same way, only using the udp_client class instead and declaring the port and IP to the remote server. In the client code below, each OSC bundle is manually assembled before being sent, similar to the PD client from before. This gives us more control over the bundle content, as we will explore further in the post.
Step 2 - Networked metronome
In this example, we will build on the code developed in Step 1 and design a simple system for controlling audio playback in a remote location. This metronome will work by generating a tick sound whenever a "./tick" message is received on the server. You can use any tick sound you want, just make sure to include it in the directories of your PD and Python files.
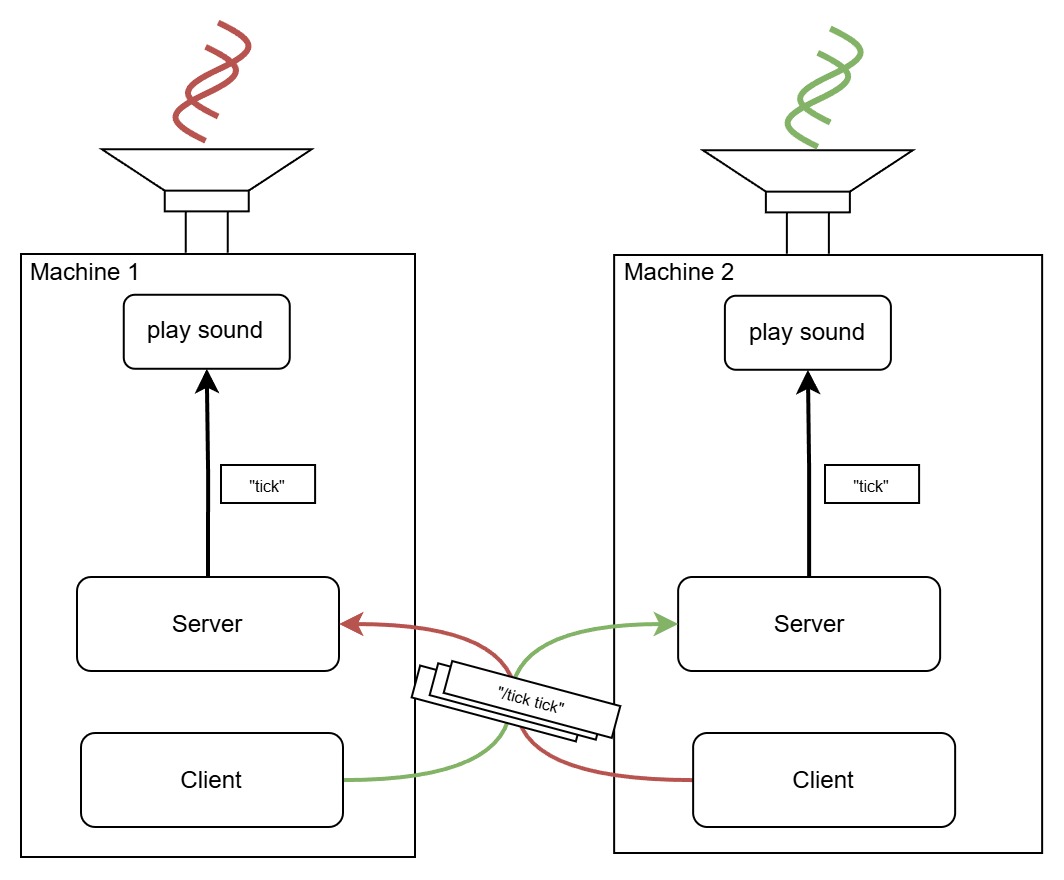
In PD, we can use the [soundfiler] object to create a buffer for our tick audio file, and [tabplay~] to play the audio on demand. Sending a bang to tabplay will play the audio once at normal speed. On the client side, simply add a [metro] object at the top of the chain to send tick messages in a nice and consistent sequence.
Similarly, we must alter the code in our Python server to play an audio file when "tick" messages are received. First, define the path to the tick audio file in a variable (called "audio") in the config section. Then, replace the print message in the dispatcher function with the playsound function from the playsound library and pass the "audio" path variable as its argument.
In the Python client, we imitate the PD code by adding metronome logic for consistent and stable ticking. First, add two new config variables, BPM and BEAT_INTERVAL. Changing the value of BPM will alter the speed of the metronome ticking. Next, in the sendMsg function, change the for loop into a while loop and insert a sleep function at the end.
The BEAT_INTERVAL variable is passed as the main argument to the sleep function so the rate of the loop is essentially controlled by the BPM variable. Finally, because we are now dealing with an endless while loop, use similar threading logic as the server to start the clients, allowing better cleanup and keyboard control.
Step 3 - Timestamp-controlled metronome
In this segment, I will begin to demonstrate how we can use and manipulate OSC timestamps to synchronize musical devices across a network. The code for this step is almost identical to step 2 but with added logic to include custom timestamps in our OSC bundles on the client side and to review timestamps on the server side.
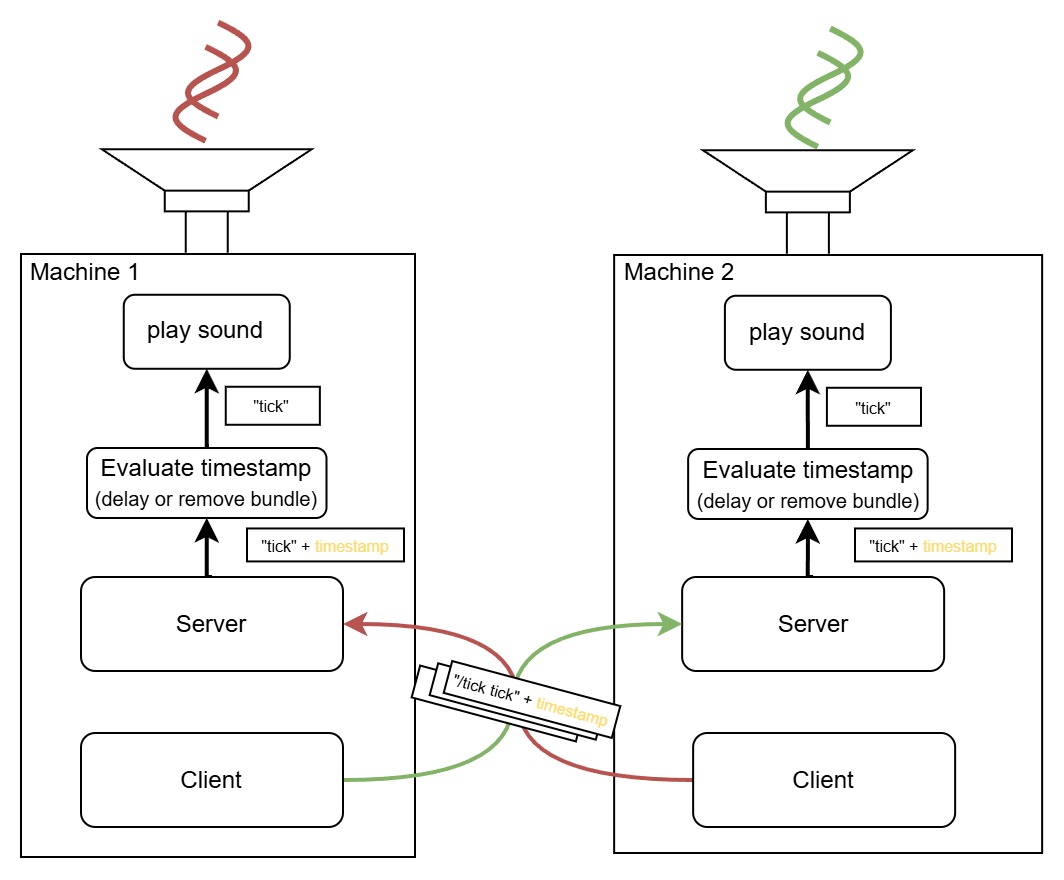
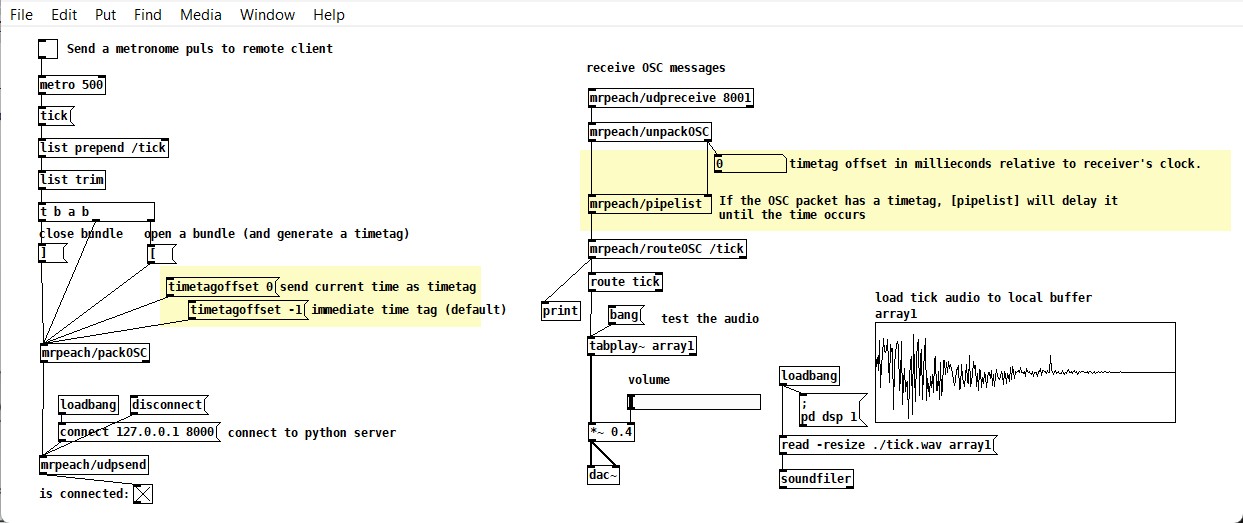
In PD, the mrpeach library conveniently hides most of the complexity needed to evaluate and create timestamps. However, on the server side, we have to add the objects [pipelist] after [unpackOSC] to delay the incoming message according to its timestamp. On the client side, [packOSC] allows us to create custom timestamps for our bundles through the timestampOffset argument. More on this in step 4.
In Python, we can use the same server code described in step 2. This is because the python-osc library also conveniently hides most of the complexity needed to evaluate timestamps. The client side is a different story.
To pack a custom timestamp with python-osc, we need to supply the OscBundleBuilder function with a timestamp as an argument. However, getting the timestamps and integrating them into our client send loop was not as straightforward as I thought. At first, I attempted to retrieve the current NTP timestamp at the start of the messaging loop in the sendMsg function, using the Python time function, like so:
Unfortunately, this approach failed. Multiple bundles ended up having the same timestamp, being scheduled to play at exactly the same time. After some debugging, I found that the error was due to the sleep function not receiving a unique timestamp at every loop.
To fix the issue, I designed a better system that creates predictable and unique sequences of timestamps based on the BPM and BEAT_INTERVAL variables. In this design, the current NTP timestamp is only retrieved once before the main while loop starts. Then, the timestamp is incremented manually based on the BEAT_INTERVAL and the current iteration of the loop, resulting in unique timestamps whose values are only separated by the duration of one beat.
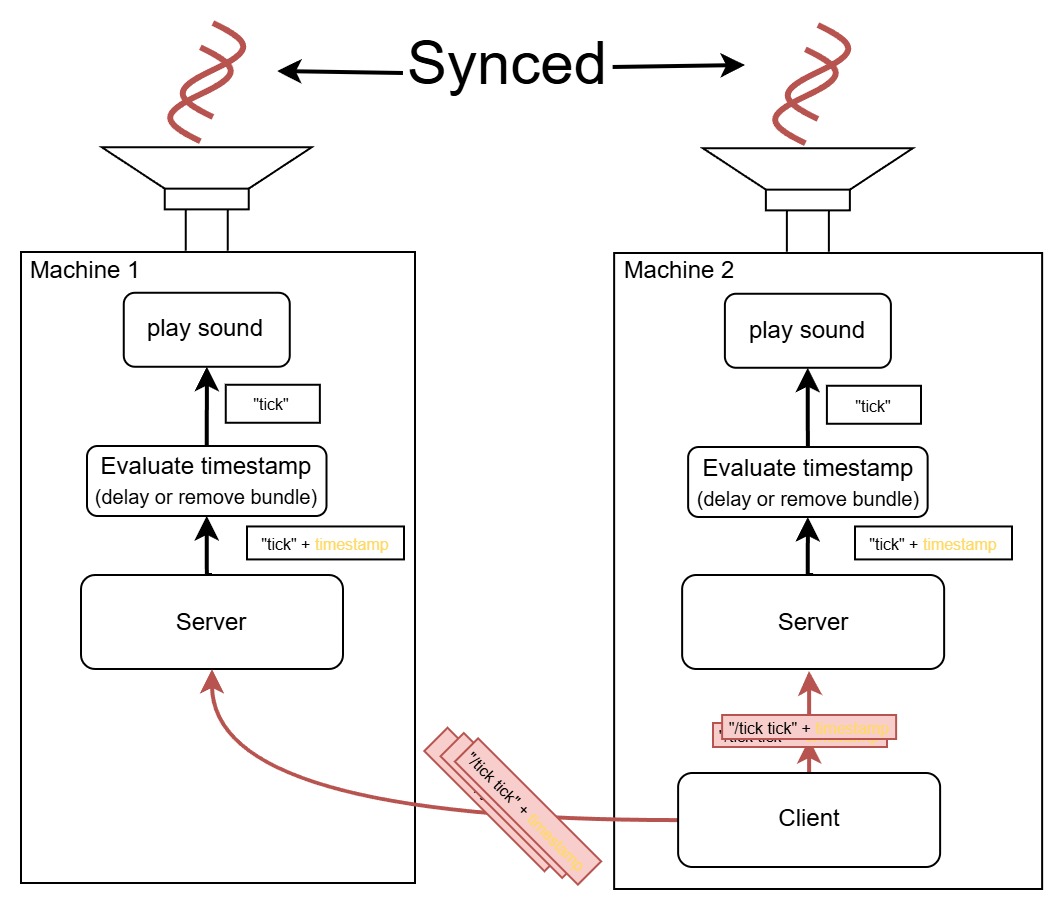
Step 4 - Forward Synchronized metronome
In this final part, we put the cherry on top by achieving Forward Synchronization. Up to this point, we've only sent control messages in one direction and scheduled playback on the server side. Now, we implement synchronized playback at both ends, on the sending and receiving sides, and offset our timestamps to schedule playback in the future.
This is also where we see the full benefit of how we've structured our codebase. To achieve forward sync, we simply reuse the code from Step 3 and create a second local client. This client sends the exact same OSC bundle, previously sent only to the remote server, to the local server as well.
in PD, leave the server setup as is, and add another [udpsend] object on the client side. In this second [udpsend], specify the port of the local server running within the same patch. To customize timestamps, use the timetagoffset argument of [packOSC]. The value provided to timetagoffset specifies how many microseconds to offset the current NTP timestamp. So, for example, a value of 4,000,000 (4e+06) results in a 4-second offset into the future. For more details, refer to the object’s help file.

In Python, we need to make similar changes to the client code. First, duplicate the client logic in the config section to create another udp_client and connect it to the port of your local Python server. To transmit the same bundle to both locations, copy and paste the send function in the messaging loop and make other necessary changes to the Threading logic to ensure both clients are on the same thread.
Finally, add a new variable in the config section called FORWARD_OFFSET. This will define how many seconds into the future you wish to schedule your playback. Then, add FORWARD_OFFSET to the custom_timestmap variable in the messaging loop of the sendMsg function to offset the timestamp a fixed amount.
That's it. Now we have a scalable and dynamic system for bidirectional Forward Synchronization of musical devices between PD and Python.
Sources
Schmeder, & Freed, A. (2008). Implementation and applications of open sound control timestamps. ICMC.http://cnmat.berkeley.edu/publications/implementation-and-applications-open-sound-control-timestamps
Schmeder, Freed, Wessel (2010). Best Practices for Open Sound Control. Center for New Music and Audio Technologies (CNMAT), UC Berkeley.https://opensoundcontrol.stanford.edu/files/osc-best-practices-final.pdf