Using Python to Control Ableton Live with MIDI
10 Jul 2023
•
python
•
ableton
•
mapping
•
midi
...
Designing live performances for The Holy Mountain (my band) has always been challenging. During our live shows, we have to manage looping, sample triggering, complex tempo changes, and fast navigation between synthesizer presets. For our upcoming liveset, I have been trying to figure out how to play drums and synthesizers simultaneously, playing synth with my right hand and drumming with my remaining limbs. This problem inspired me to develop a clever way to navigate Ableton Live (Live) using very few midi controls.
In this post, I demonstrate how you can use some Python code (++) to acheive more complex midi mapping capabilities between your midi-controller and digital audio workstation (DAW).
Overview and Requirements
When searching for a solution to my "playing drums and synth at the same time" problem, I naturally wanted to use Ableton Live as my primary DAW software. One of the greatest things about Live is its rich midi capabilities and visual design, enabling control of just about anything from anywhere. However, Ableton alone does not provide users with progressive capabilities to customize their mapping schemas. Their platform is fairly restricted in these particular areas. So to achieve what I was looking for, I had to use additional code and software to manipulate and control Ableton from "afar".
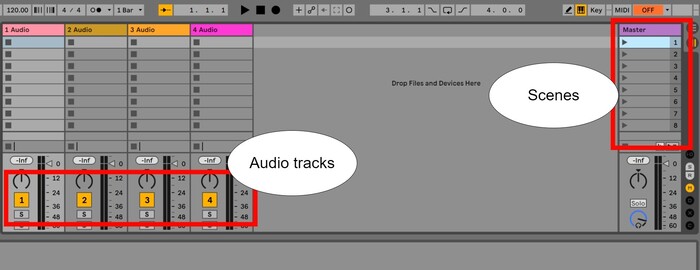
The result was a mapping system built with Ableton and some Python software that enabled me to skip up and down scenes (vertical axis) and between audio tracks (horizontal axis) using very few midi controls. But navigating Live's visual interface like a 2D matrix is not uncommon. In fact, most midi-controllers afford this kind of behavior for traversing sample spaces and audio effects. What makes my system unique is that I use Python to associate custom collections of audio tracks with individual scenes in Live. With this mapping approach, it's possible (and easy) to jump between different mapping presets for each scene, dramatically limiting the number of controls needed to navigate fairly complex Live sessions.
Below you'll find important details about the design, code, and general Live specs I used to build this custom navigation system for my liveset. To be able to replicate my system, you only need a few key items:
- A USB midi keyboard or controller
a Python environment with the rtmidi library installed
- A virtual midi driver
- Ableton Live 11 (++)
For the record, I use the MIDIPLUS X4 as a midi-controller and Tobias Erichsen's loopMIDI as my virtual device. For Mac/OSX users, I recommend setting up a IAC virtual midi bus. No third-party programs required.
Python Setup
The Python program sits in-between the controller and Live, and has two primary jobs; to intercept midi messages from the midi-controller, passing them off to Live, and to associate different collections of audio tracks with individual scenes. I start by representing each scene and audio track as a scene_config dictionary in Python. The dictionary key-value pairs represent Live's session view as a 2D matrix stucture. Each key represents a scene, and each value represents a collection (array) of tracks (integers).
To handle the track skipping process, I iterate and loop over the scene_config arrays using Python's Yield function in response to messages from my midi-controller. Yield is a type of Python Generator which are special functions that return lazy iterator. With these objects, you can asynchronously iterate over array items one-by-one without having to explicitly keep track of the previous or current index. As a bonus, Yield also automatically handles looping as it returns to start (0th index item) when iterating past the last item of an array (-1st index).
In the example below, I pass a Live scene from scene_config into a function called nextTrack. The function returns a generator object I can use to iterate over the audio tracks using the next() function.
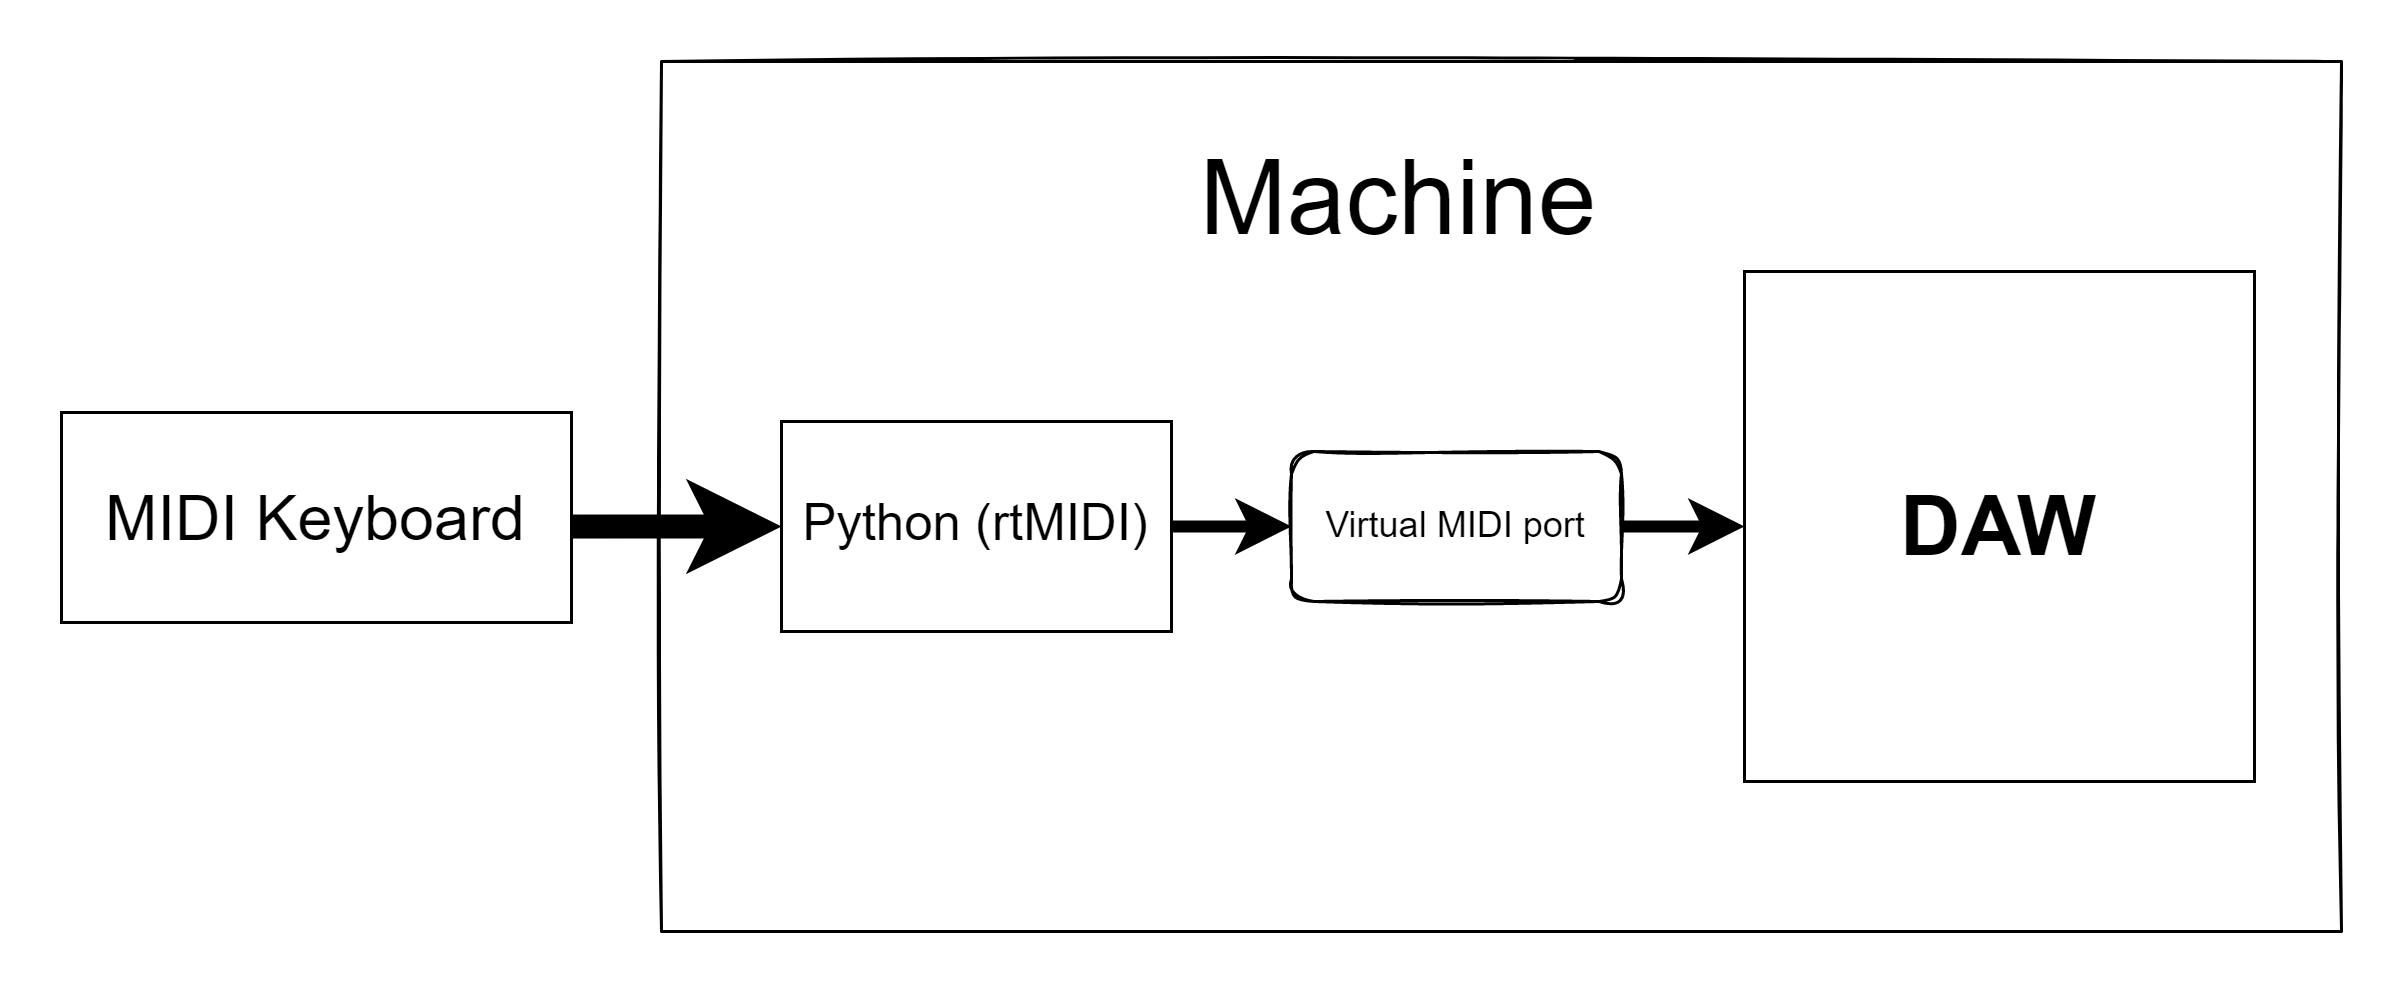
The second job of the Python script is to handle the midi communication between the controller and Live. I have to use two midi devices for this to work, one physical USB controller (the input) and one virtual midi driver (the output going to Ableton Live). Fortunatley, it's straightforward to initialize communication between multiple midi devices using Python rtmidi. In the below example, a simple midi input initialization process is defined using rtmidi. The program reads out the available midi devices and asks which device it should use as its input. Here, I would choose the physical controller as my input device.
To initialize a midi output connection, I repeat the above code, only substituting rtmidi.MidiIn() with rtmidi.MidiOut() and using the virtual midi driver as my device.
To send messages, rtmidi objects have a send_message() method to use on initialized midi objects. As arguments, the method requires the midi channel, note value, and ON/OFF message.
Pro tip: If you're unsure about what kind of messages or values your midi-controller in sending out, you can print out raw messages from a rtmidi connection. I use this script to orient myself with new midi devices:
Live Setup
In Live, I only need to do three things to enable the proposed 2D navigation. First, ensure that the scene_config dictionary corresponds to the number of scenes and tracks in my Live session. Second, enable the correct midi settings, and third, provide the correct midi mapping.
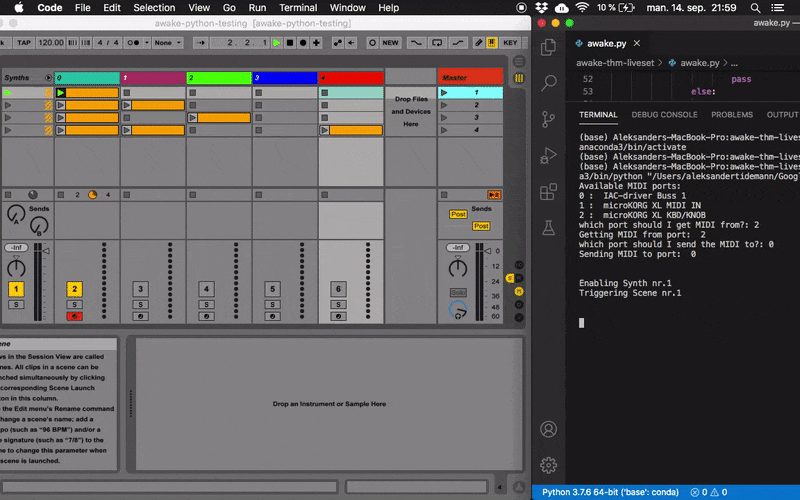
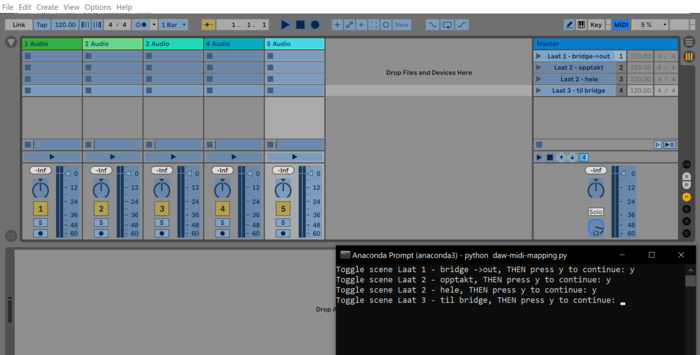
In response to points one and three, I wrote an additional Python script to guide me through the midi-mapping in Live based on my scene_config. Having a single source of truth is always a good programming strategy. The script calculates and iterates through all the possible midi values that need to be mapped to a parameter in Live. With a simple command line UI, I can select parameters in Live before triggering the Python script to send messages to Live's midi-mapping context, as seen in the image below.
To see the full code, visit the source code section below.
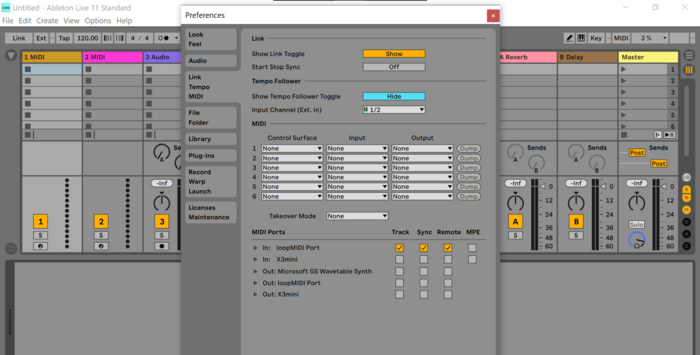
Finally, after midi-mapping, I have to set the correct midi settings. Per default, Live will usually recognize and enable any compatible midi device it detects for track, sync and remote. However, we dont want Live to listen directly to our midi controller. We only want to intercept message from Python on the virtual midi port we have initialized. To open the midi preferences in Live, Hit "ctrl" + "," and navigate to the midi section. Here, uncheck every device except for incoming messages on your virtual midi port.
Concluding Thoughts
So there you have it. We can easily expand the capabilities of our Live projects with some creative coding and a virtual midi driver. By using the free and open-source Python rtmidi library, bridging Live with Python is practically effortless. From there, I recommend optimizing your state management and asynchronous parameter control with Python Generators and lazy iterators. Together, this is a force to be reckoned with.
On a side note, there are alternatives to writing custom software for midi communication between Live and elsewhere. For instance, AbletonOSC is a MIDI remote script that provides an Open Sound Control (OSC) interface to control Live. Using OSC will eliminate the need for a virtual midi driver and provide more advanced remote control options.
Download Link and Source Code
The full source code of this project is open source and available on my GitHub.
If you want to contribute, you are free to do so. Simply fork the repo and make a pull request.