The Sun Right Now - Screensaver

30 Aug 2025

astronomy

software

nodejs

react

...

myImage

In a recent episode of Nyskjerrige Norge, a podcast by the Norwegian Research Council, host Kristoffer Schau meets with professor Mats Carlsson at the Rosseland Centre for Solar Physics, UiO, to discuss the mysteries of our sun. During the show, a particular comment made by Schau caught my interest. There was TV-feed in Carlsson's UiO lunchroom that displayed scientific images of the sun in real-time, and Schau remarked that it would be great if such a feed was available as a personal screensaver. This inspired me, and due to my lifelong interest in space, amateur astrophotography and software development, I decided to build such a screensaver for myself.

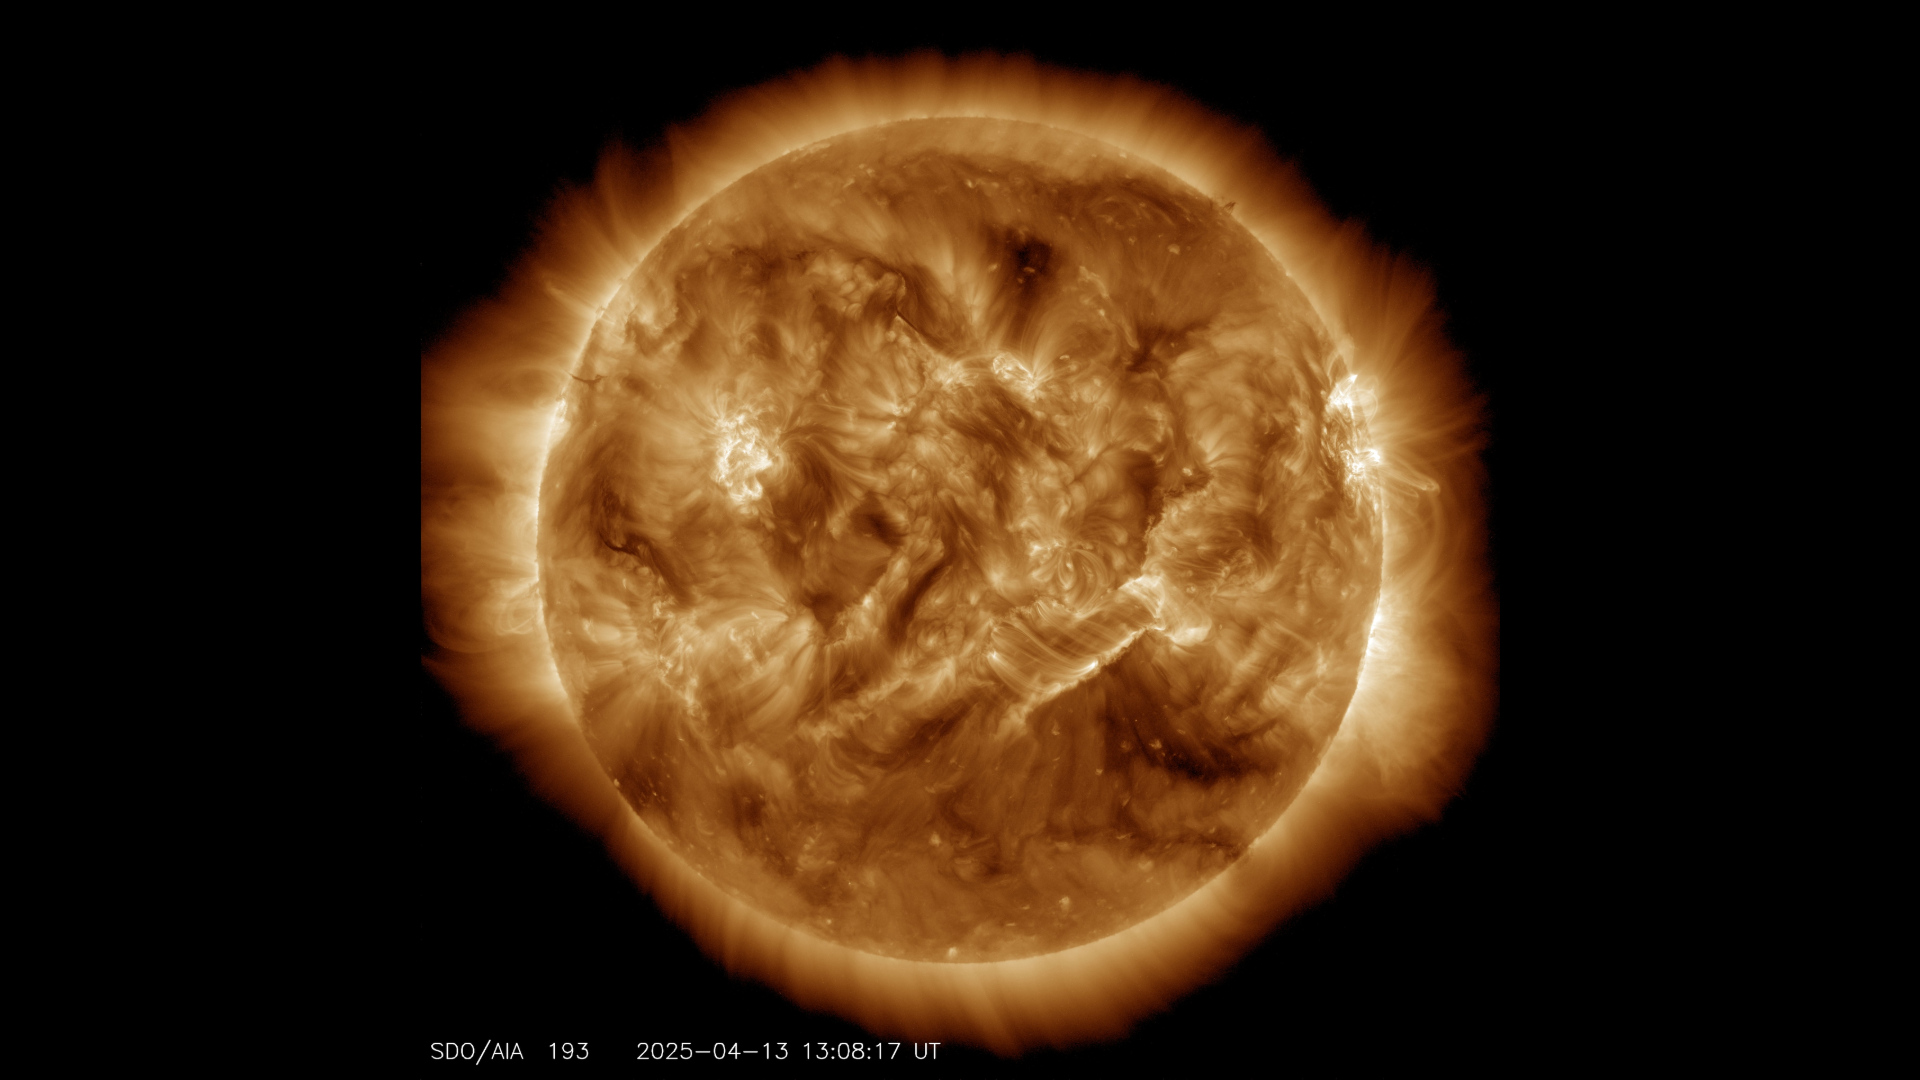
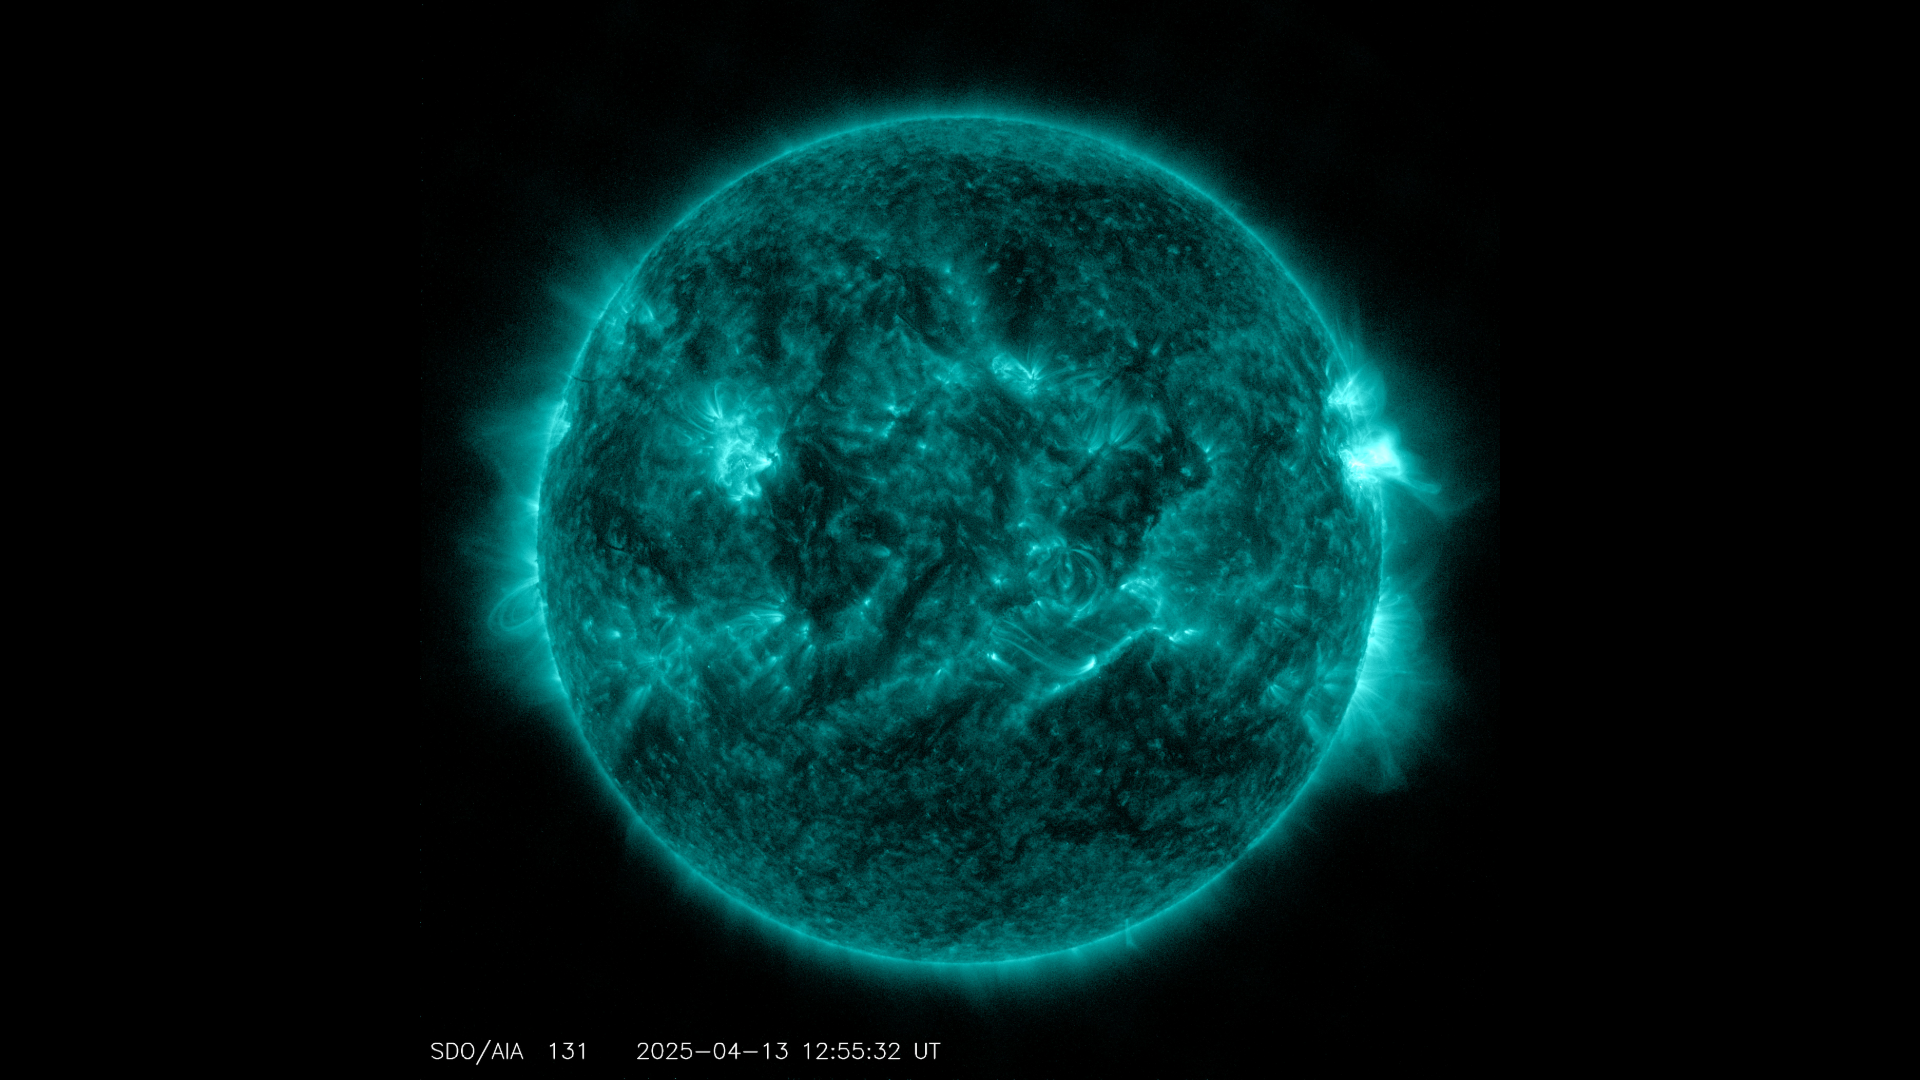
In this post, I present The Sun Right Now, my new desktop screensaver that displays 4K images of the sun in a mesmerizing slideshow. What's more, these images are real-time and updates automatically every 5 minutes to ensure only the very latest captures are shown. Below, I share how the app works and how you can use it for yourself.

To download the screensaver, visit my GitHub release page. For a quick preview, check out this online version in the browser.

How it Works

The screensaver is essentially a tiny Nodejs API and Electron application window that runs some React frontend to display images on the screen.

myImage

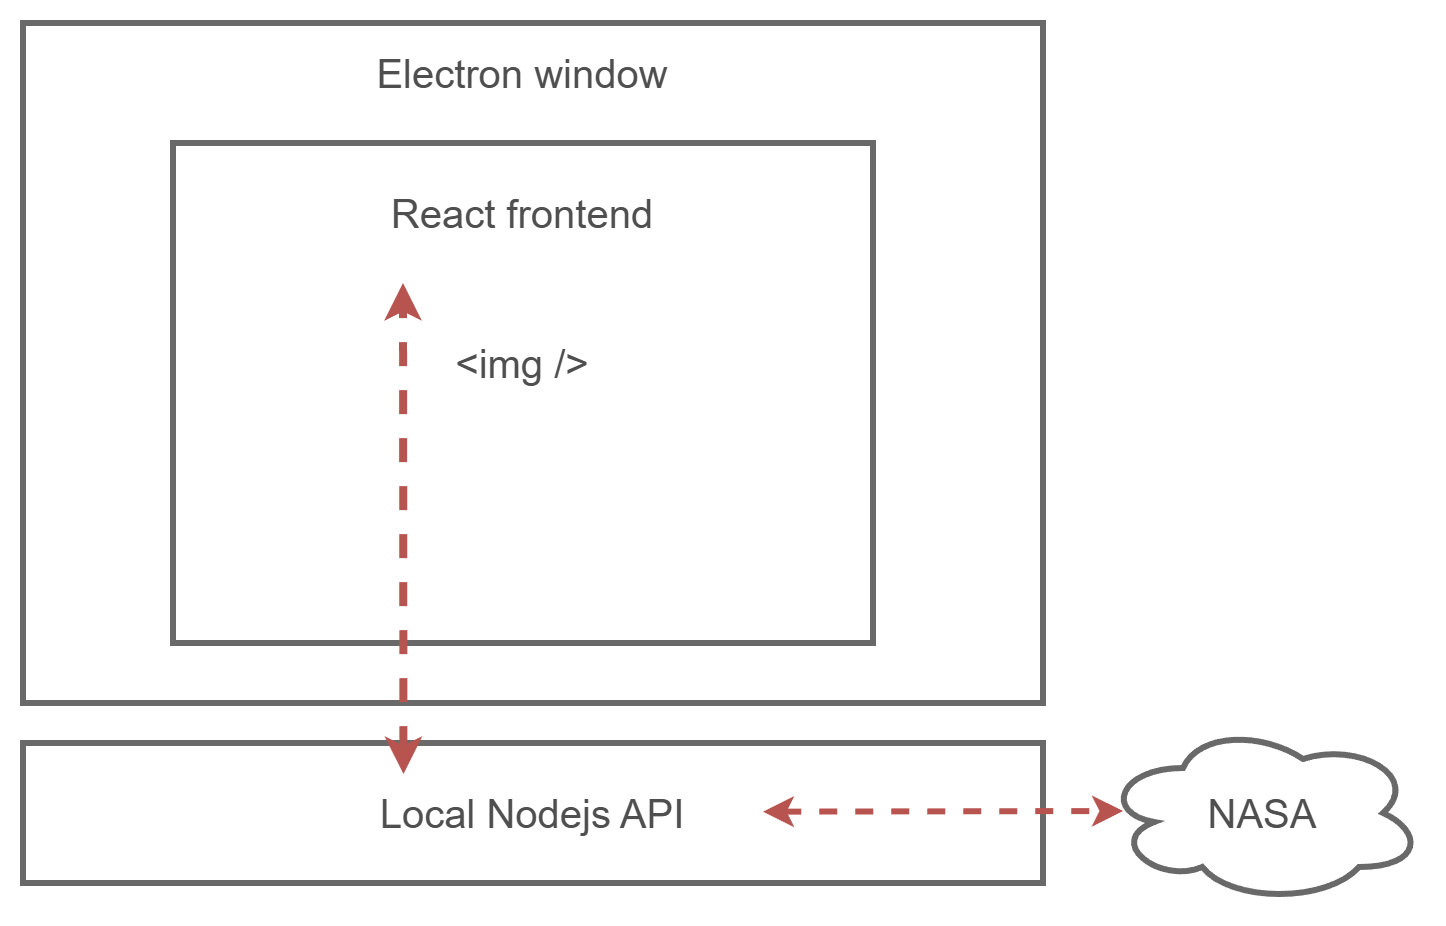
The Nodejs API has one job; to retrieve image filenames from a public NASA repository that holds images from their Solar Dynamics Observatory (SDO). The SDO is a satellite currently in orbit around Earth taking photos and continuous measurements of the sun. Read more about the SDO project on their website. All the scientific data from NASA SDO is publically available and hosted online. This was great news for me because when the images are already hosted, I didn't need to fetch them from some API, I could just retrieve the URLs to the images and load them inside my app.

To get the very latest images, on demand, I took advantage of how NASA organizes their SDO images. The photos are put into a folder structure that represents days, months and years. The image filenames themselves also include the date, time, type, and resolution of the images. You can browse the NASA SDO assets folder I use here. With this in place, I only had to use the current date to find the correct image folder. Then, to get the latest images, I simply fetched all the filenames in the folder and sorted them locally on my node API based on the values in their filenames. Here I filter for 4k images only.

Here is the Node local server in full:

// NodeJs API local server -> "./src/api.mjs"
// Fetches, cleans and filers image filenames from NASA SDO.
import express from "express";
import cors from "cors";
const app = express();
const port = 8001;
app.use(cors());
app.use(express.json());
const getCurrDate = () => {
// get current date in format string "YYYY-MM-DD"
let dateObj = new Date();
let year = String(dateObj.getUTCFullYear());
let month = String(dateObj.getUTCMonth() + 1); // get month 1-12
month = Number(month) < 10 ? "0" + month : month;
let day = String(dateObj.getUTCDate());
day = Number(day) < 10 ? "0" + day : day;
return `${year}-${month}-${day}`;
};
app.get("/api/thesunrightnow", async (req, res) => {
// retrieve new imgfilenames from the NASA server.
// get date "2025-12-24" and make "2025/12/24"
let date = getCurrDate();
date = date.replaceAll("-", "/");
const baseUrl = `https://sdo.gsfc.nasa.gov/assets/img/browse/${date}/`;
const res2 = await fetch(baseUrl);
const html = await res2.text();
// Find all hrefs ending in .jpg
const imageRegex = /href="(.*?\.jpg)"/g;
const matches = [...html.matchAll(imageRegex)];
// Build full URLs from these
const filenames = matches.map((match) => baseUrl + match[1]);
// Sort by filename descending (based on timestamp in filename)
const sorted = filenames.sort().reverse();
// get only latest 16 filenames
const lastSixteen = sorted.slice(0, 16);
// every images comes in 3 resolutions, 512, 2048, 4096.
// When I only grab the images with 4096 resolution, this leaves 4 images in total.
const imgFileNames = lastSixteen.filter((e) => e.includes("4096"));
res.status(200).json(imgFileNames);
});
const server = app.listen(port, () => {
console.log(`Local API listening at http://localhost:${port}`);
});
// properly close the server when .exe is quit or interuppted
process.on("SIGTERM", () => {
server.close(() => {
console.log("HTTP server closed.");
});
});
process.on("SIGINT", () => {
server.close(() => {
console.log("HTTP server closed.");
});
});

In my React front-end, I call my local Node API first to acquire the initial batch of image filenames and to initalize the image slideshow. To make the filename-fetching recurrent and self-updating, I use the setInterval method in a UseEffect function to schedule API calls at fixed intervals. This happen every 5 minutes in my app, but it's easy to choose another interval simply by editing the second argument of the setInterval method.

To render the sun images on-screen, the filenames are passed one by one to an img HTML element. To handle the "one-by-one" slideshow-part, another setInterval method is used to iterate over the list of filenames and choose a new index automatically every 10 seconds, essentially rotating the image carousell.

Here is the React front-end component in full:

// React front-end -> "./src/TheSunRightNow.jsx"
// get and display sun images in fullscreen
import { useEffect, useState } from "react";
import useWindowSize from "./hooks/useWindowSize";
const TheSunRightNow = () => {
// Show slideshow of real-time NASA images of the sun.
// The images are fetched from the NASA SDO database (../api.mjs)
// and updated every 5 minutes.
const [currIdx, setCurrIdx] = useState(0);
const [imgFileNames, setImgFileNames] = useState([""]);
const [isLoading, setIsLoading] = useState(false);
const [isError, setIsError] = useState(false);
const [isReady, setIsReady] = useState(false);
const windowSize = useWindowSize();
const getImgFileNames = async () => {
// Fetch new filenames from API
try {
setIsLoading(true);
const res = await fetch("http://localhost:8001/api/thesunrightnow");
const data = await res.json();
setImgFileNames(data);
setIsLoading(false);
setIsReady(true);
} catch (error) {
setIsError(true);
setIsLoading(false);
setIsReady(false);
console.log(error);
}
};
useEffect(() => {
// on mount
getImgFileNames();
// Get new filenames from API every 5 minutes
const interval = setInterval(() => {
getImgFileNames();
}, 300000);
// Cleanup on unmount
return () => clearInterval(interval);
}, []);
useEffect(() => {
// Rotate sun image every 10 seconds
const interval = setInterval(() => {
setCurrIdx((prevIndex) => (prevIndex + 1) % imgFileNames.length);
}, 10000);
// Cleanup on unmount
return () => clearInterval(interval);
}, [imgFileNames.length]);
return (
<div className="flex items-center justify-center min-h-screen bg-black text-white">
{isError ? (
<p>Shit. Something went wrong</p>
) : !isReady ? (
<></>
) : (
<img
src={imgFileNames[currIdx]}
alt="Sun Image"
style={{
width: windowSize.height || 720,
height: windowSize.height || 720,
}}
/>
)}
</div>
);
};
export default TheSunRightNow;

Finally, to host my project inside a nice application window (and not a browser window) I used the Electron library as a wrapper for my React front-end and Node API. Electron provides a lot of boilerplates and tools to manage user input and the compilation of the app into a ready executable.

In my case, not much config was needed with Electron, but I had to be explicit about a few processes to make my app window act like a screensaver. For instance, I had to make sure that it loaded in fullscreen, covering any taskbar or cursor that might be in front, see to it that cursor movements and keyboard presses exited the app, and start the Node API in the correct order. At the very end, I also added some Electron config for switching between development and production mode and edited the package.json with the necessary build settings for both Windows and macOS.

See my full Electron "main.js" here:

// Electron config file -> "./src/main.js"
// Starts my API node server and hosts my React front-end as a desktop App using Electron
import { app, BrowserWindow, screen } from "electron";
import isDev from "electron-is-dev";
import { fileURLToPath } from "url";
import path from "path";
// First, start my API server for fetching images from NASA
import "./api.mjs";
// Flag true if running "npm run start" (checking prod build in dev mode).
// Flag false for dev and production.
const checkBuild = false;
// Create the main screensaver window
const createWindow = () => {
const win = new BrowserWindow({
fullscreen: true,
frame: false,
alwaysOnTop: true,
skipTaskbar: true,
webPreferences: {
nodeIntegration: true,
},
});
if (isDev && checkBuild) {
// when I want to check the prod build in dev
console.log("Dev and checkBuild env");
const __filename = fileURLToPath(import.meta.url);
const __dirname = path.dirname(__filename);
const filePath = path.join(__dirname, "dist", "index.html");
console.log("Loading from file:", filePath);
win.loadFile(filePath);
} else if (isDev) {
// dev
console.log("Dev env");
win.loadURL("http://localhost:8000");
console.log("Loading from dev server:", "http://localhost:8000");
} else {
// this is production
console.log("Production env");
const __filename = fileURLToPath(import.meta.url);
const __dirname = path.dirname(__filename);
const filePath = path.join(__dirname, "dist", "index.html");
console.log("Loading from file:", filePath);
win.loadFile(filePath);
}
// Exit screensaver on mouse or keyboard activity
win.webContents.on("before-input-event", (event, input) => {
if (["mouseDown", "mouseMove", "keyDown"].includes(input.type)) {
app.quit();
}
});
// Extra exit method for mouse movements
const monitorMouseMovement = () => {
let lastPos = screen.getCursorScreenPoint();
const interval = setInterval(() => {
const currentPos = screen.getCursorScreenPoint();
if (currentPos.x !== lastPos.x || currentPos.y !== lastPos.y) {
clearInterval(interval);
app.quit();
}
lastPos = currentPos;
}, 1000); // check every second
};
monitorMouseMovement();
};
function showConfig() {
console.log("Screensaver config requested.");
}
// Handle command-line arguments and slice out the first one (electron binary)
const args = process.argv.slice(1);
app.whenReady().then(() => {
if (args.some((arg) => arg.toLowerCase() === "/s")) {
createWindow();
} else if (args.some((arg) => arg.toLowerCase() === "/c")) {
showConfig();
app.quit();
} else if (args.some((arg) => arg.toLowerCase() === "/p")) {
// Preview mode (not handled here)
app.quit();
} else {
// Default behavior: launch screensaver
createWindow();
}
});
app.on("window-all-closed", () => {
app.quit();
});

How to Use it

To use the screensaver on a Windows machine, first download the latest version for your system from this GitHub release page. Then, right-click on the screensaver file (.scr) and hit "install". Be aware that you may need to approve a few security warnings when first running the screensaver. This is simply because it hosts a tiny server and makes some HTTP requests while running, nothing dangerous.

On OSX, coming soon...

For development, follow the instructions in the GitHub code repository README.

Leave a Comment